
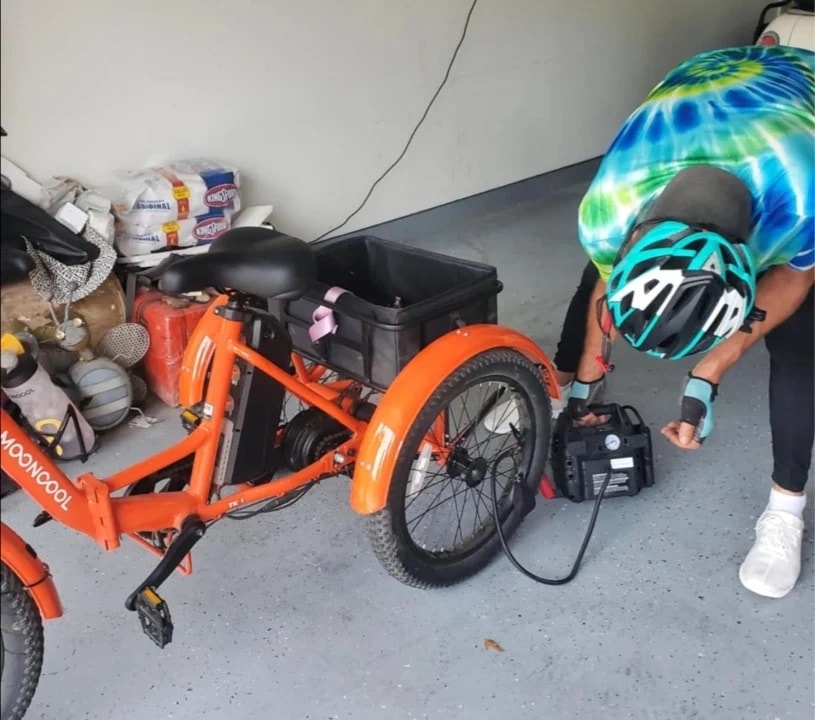
When I bought my first e-trike, I assumed it would be like a car — take it to a shop when something breaks and otherwise ignore it. That worked fine for about six months. Then the chain skipped, the brakes started squealing, and the rear tire went soft on a trail 8 miles from the parking lot. All three problems were preventable.
E-trikes are not complicated machines, but they do need regular attention. The good news: most maintenance tasks are genuinely doable at home with basic tools, a little patience, and a YouTube video or two. A few tasks are worth handing off to a bike shop. I'll tell you which is which.
Below I've broken everything down by frequency — what to check before every ride, what to do monthly, and what to schedule once or twice a year. Each task includes the tools and materials you'll need, plus an honest skill-level rating.
Skill Level Key
No tools or experience needed. If you can pump a tire or wipe down a surface, you've got this.
Requires a basic tool or two and a bit of patience. Most people can learn this in one session.
Takes practice and some mechanical comfort. Worth learning, but no shame in taking it to a shop.
Leave this one to a bike mechanic. The risk of getting it wrong outweighs the savings.

Before Every Ride
Takes 5 minutes. Skipping it takes longer to explain to the paramedics.
Check Tire Pressure
Tools
- ›Floor pump or small electric air pump with gauge (or a digital tire gauge)
How to do it
- 1Find the recommended PSI printed on the sidewall of your tire — usually 40–65 PSI for e-trike tires.
- 2Remove the valve cap and press your gauge onto the valve stem.
- 3If pressure is low, use a floor pump or electric air pump to bring it up to the recommended range.
- 4Replace the valve cap. Done.
Tip: Under-inflated tires are the number one cause of flats on the trail. Check cold — before you ride, not after.
Test the Brakes
How to do it
- 1Squeeze each brake lever firmly before you start moving.
- 2The lever should feel firm and stop well before it reaches the handlebar.
- 3Roll the trike forward slowly and apply each brake — it should stop cleanly with no grinding or squealing.
- 4If a lever feels spongy or pulls all the way to the bar, stop and adjust before riding.
Tip: The way your brakes "feel" changes gradually, so you may not notice the decline until it's too late. The squeeze test takes 10 seconds.
Check Battery Charge
How to do it
- 1Power on your display and check the battery indicator.
- 2For rides under 10 miles, 50% charge is usually fine.
- 3For longer rides or hilly terrain, start with a full charge.
- 4If the battery is below 20%, charge it before you go — running out mid-trail is no fun.
Tip: Charge the night before, not the morning of. Lithium batteries charge best at room temperature.
Quick Visual Inspection
How to do it
- 1Walk around the trike and look for anything obviously wrong — loose bolts, cracked cables, a tire that looks low.
- 2Check that the battery is fully seated and locked in.
- 3Confirm the display powers on and the motor engages when you pedal slowly.
- 4Wiggle the handlebars — they should feel solid with no play.
Tip: You're not doing a full inspection here. You're just looking for anything that changed since your last ride.
Monthly Maintenance
Set a reminder on your phone. An hour once a month keeps the big repairs away.
Clean and Lubricate the Chain
Tools
- ›Chain cleaning brush or old toothbrush
- ›Clean rags
Materials
- ›Bicycle chain degreaser
- ›Bicycle chain lubricant (wet lube for Florida humidity)
How to do it
- 1Wipe the chain down with a dry rag to remove loose dirt.
- 2Apply a small amount of degreaser to the chain and scrub with a brush. Wipe clean.
- 3Let the chain dry completely — 10 to 15 minutes.
- 4Apply chain lube one drop per link while slowly backpedaling.
- 5Let it sit for 5 minutes, then wipe off the excess with a clean rag. Excess lube attracts dirt.
Tip: In Florida's humidity, wet lube outlasts dry lube significantly. Finish Line Wet or Boeshield T-9 both work well.
Inspect Hydraulic Brakes
Tools
- ›Clean rags
- ›Isopropyl alcohol (90%+)
Materials
- ›DOT 4 or mineral oil brake fluid (match your brake brand — do NOT mix)
How to do it
- 1Squeeze each lever firmly — it should feel firm and consistent, stopping well before it reaches the handlebar. A spongy or soft feel means air in the line and it's time for a bleed.
- 2Spin each wheel and look at the rotor: it should spin freely with no rubbing. Light intermittent contact is normal; constant dragging is not.
- 3Inspect the brake pads through the caliper slot — most hydraulic pads have a wear line. Less than 1mm of pad material remaining means replace them.
- 4Check the brake hose along its full length for cracks, kinks, or chafing against the frame. Pay attention to where it passes through any guides or zip ties.
- 5Look at both ends of the hose — at the lever and at the caliper — for any sign of fluid weeping or oily residue. Even a small leak needs attention before your next ride.
- 6Wipe the rotors down with a clean rag dampened with isopropyl alcohol. Never use oil-based cleaners near rotors or pads — contamination kills braking power and requires new pads.
Tip: Hydraulic brakes are largely self-adjusting, which is why they're so common on e-trikes. The main things to watch are pad wear, rotor contamination, and that firm lever feel. If the lever ever feels soft or pulls closer to the bar than usual, get it bled before your next ride — don't wait.
Check and Tighten Bolts
Tools
- ›Allen wrench set (4mm, 5mm, 6mm)
- ›Torque wrench (optional but helpful)
How to do it
- 1Work around the trike systematically: stem bolts, handlebar clamp, seat bolts, rack bolts, fender bolts.
- 2Gently try to wiggle each component — if it moves, the bolt needs tightening.
- 3Snug bolts firmly but don't crank them. Over-tightening aluminum bolts strips threads.
- 4If you have a torque wrench, most stem and handlebar bolts spec at 5–6 Nm.
Tip: Vibration from riding loosens bolts over time. A loose stem is a safety issue — don't skip this one.
Inspect Tires for Wear and Damage
How to do it
- 1Spin each wheel slowly and look at the tread surface.
- 2Check for cuts, embedded glass or debris, sidewall cracks, or flat spots.
- 3Look at the tread depth — most e-trike tires have wear indicators. When the center tread is gone, it's time.
- 4Check the sidewalls for bulges, which indicate internal damage and mean replace immediately.
Tip: Florida's asphalt gets hot and abrasive. Tires wear faster here than in cooler climates.
Battery Health Check
Materials
- ›Dry cloth
How to do it
- 1Remove the battery from the trike and inspect the casing for cracks, swelling, or discoloration.
- 2Check the contact points for corrosion — a little white residue is normal; heavy buildup is not.
- 3Wipe the contacts gently with a dry cloth.
- 4Reinstall and confirm it seats and locks securely.
- 5Check that the battery charges to 100% and holds charge between rides.
Tip: A battery that no longer reaches full charge or drains unusually fast is telling you it's near end of life. Most e-trike batteries last 500–800 charge cycles.
Inspect Display and Wiring
How to do it
- 1Power on the display and confirm all functions work — speed, battery level, assist level, odometer.
- 2Trace the main wiring harness from the display down to the motor and battery.
- 3Look for chafing, pinched spots, or connectors that have worked loose.
- 4Gently press each connector to confirm it's fully seated.
Tip: Most electrical gremlins on e-trikes trace back to a loose connector, not a failed component.
Annual (or Every 500 Miles)
These are the bigger jobs. Some you can do yourself; a few are worth paying a shop for.
Replace Hydraulic Brake Pads
Tools
- ›5mm Allen wrench
- ›Flat-head screwdriver or pad spreader tool
- ›Isopropyl alcohol (90%+) and clean rags
Materials
- ›Replacement hydraulic brake pads (match your caliper brand and model exactly)
How to do it
- 1Remove the wheel to access the caliper clearly.
- 2Use an Allen wrench to remove the pad retaining bolt or pin from the caliper.
- 3Slide the old pads out — they'll come out as a pair, usually with a small spring between them.
- 4Before installing new pads, use a flat-head screwdriver or pad spreader to gently push the pistons back into the caliper. This makes room for the thicker new pads.
- 5Wipe the rotor down with isopropyl alcohol and a clean rag — any oil or contamination on the rotor will transfer to the new pads immediately.
- 6Slide the new pads in, reinstall the retaining bolt or pin, and reinstall the wheel.
- 7Squeeze the lever repeatedly until it firms up — the pistons need to advance to meet the new pads.
- 8Bed in the new pads: find a safe stretch of pavement, accelerate to moderate speed, and apply firm (not panic) braking to a near-stop. Repeat 8–10 times. This transfers a thin layer of pad material to the rotor and dramatically improves stopping power.
Tip: Never touch the rotor or new pad surfaces with bare hands — skin oils contaminate them. Handle pads by their backing plate only.
Hydraulic Brake Bleed
Tools
- ›Bleed kit specific to your brake brand (Shimano, Tektro, Magura, etc.)
- ›Syringes and bleed block
- ›Torque wrench
Materials
- ›Correct brake fluid for your system: mineral oil (Shimano, Magura) OR DOT 4/5.1 (Tektro, SRAM) — never mix types
How to do it
- 1A hydraulic bleed pushes fresh fluid through the system to purge air bubbles that cause a spongy lever feel.
- 2The procedure varies significantly by brand — Shimano uses a gravity bleed, Tektro uses a syringe-to-syringe method, Magura uses a different port layout entirely.
- 3Using the wrong fluid type (mineral oil vs. DOT) will destroy the seals inside your levers and calipers. Confirm your fluid type before buying anything.
- 4If you want to learn: your brake brand's official bleed video is the only tutorial worth following. Generic videos get the details wrong.
- 5If you're not comfortable: a bike shop bleed runs $20–$40 per brake and takes about 20 minutes. It's worth it.
Tip: Most riders never need to bleed their brakes at home. If your lever feels firm and consistent, the system is fine. A bleed only becomes necessary when that feel changes — or after a hose replacement.
Replace the Chain
Tools
- ›Chain wear indicator tool
- ›Chain breaker tool
- ›Master link pliers (if using a master link)
Materials
- ›Replacement chain (match speed count — 7, 8, or 9 speed)
- ›Chain lube
How to do it
- 1Use a chain wear indicator to check stretch — replace at 0.75% wear or before.
- 2Shift to the smallest chainring and smallest rear cog.
- 3Use the chain breaker to push out a pin, or open the master link with master link pliers.
- 4Thread the new chain through the derailleur following the same path as the old one.
- 5Connect the chain with a new master link or by pressing in a new pin.
- 6Check that the chain runs smoothly through all gears before riding.
Tip: Replacing a worn chain before it wears out your cassette saves you $60–$120 on cassette replacement. The chain wear tool pays for itself the first time you use it.
Derailleur Adjustment
Tools
- ›Phillips screwdriver
- ›5mm Allen wrench
- ›Barrel adjuster
How to do it
- 1Shift to the smallest rear cog and check that the derailleur pulley aligns directly below it.
- 2Use the limit screws (marked H and L) to set the high and low limits — the chain should not fall off either end.
- 3Use the barrel adjuster to fine-tune cable tension until shifting is crisp in all gears.
- 4Test every gear combination while pedaling slowly.
Tip: If you've replaced a cable or chain and shifting is suddenly off, start with the barrel adjuster before touching the limit screws.
Wheel Truing
Tools
- ›Spoke wrench (if attempting yourself)
- ›Truing stand (if attempting yourself)
How to do it
- 1Spin the wheel and watch for side-to-side wobble — more than 2mm is worth addressing.
- 2A bike shop can true a wheel in 15–20 minutes for $15–$25.
- 3If you want to learn, start with a YouTube tutorial and a cheap truing stand. It takes practice.
Tip: An out-of-true wheel puts uneven stress on spokes and can cause a spoke to break mid-ride. Don't ignore a significant wobble.
Motor and Controller Inspection
How to do it
- 1Listen for any new grinding, clicking, or whining from the motor during a ride.
- 2Check that the motor mounting bolts are tight.
- 3Inspect the motor cable connection for corrosion or looseness.
- 4For anything beyond visual inspection and bolt-tightening, take it to an e-bike shop.
Tip: Hub motors on e-trikes are sealed and largely maintenance-free. If yours is making noise it didn't make before, that's worth a shop visit — not a DIY teardown.
The Starter Tool Kit
You don't need a full workshop. These 10 items cover 90% of home e-trike maintenance.
Floor pump with gauge
$25–$45Get one with a pressure gauge built in. A hand pump is fine for emergencies, not for regular use.
Allen wrench set (2–8mm)
$10–$20Most e-trike bolts are Allen head. A folding multi-tool set works fine.
Chain lube (wet formula)
$8–$12Finish Line Wet, Boeshield T-9, or Squirt Long Lasting are all solid choices for Florida.
Chain degreaser
$8–$15Simple Green diluted 1:1 works. Dedicated bike degreasers like Muc-Off are faster.
Chain wear indicator
$5–$15A $5 Park Tool CC-2 tells you exactly when to replace your chain. Worth every penny.
Chain breaker tool
$10–$25Needed for chain replacement. Park Tool CT-5 is reliable and inexpensive.
Tire levers (set of 3)
$3–$8For removing tires during a flat repair. Plastic levers won't damage your rims.
Patch kit or spare tube
$5–$10Know your tire size before buying tubes. It's printed on the tire sidewall.
Clean rags
$0–$5Old t-shirts cut into squares work perfectly. You'll go through more than you expect.
Torque wrench (optional)
$20–$40Not essential, but helpful for stem and handlebar bolts where over-tightening is a real risk.
I'll be honest — I didn't enjoy maintenance at first. It felt like one more thing to figure out. But after a few months of doing the basics consistently, it became routine. Now I actually like it. There's something satisfying about knowing your machine is dialed in before you roll out.
Start with the pre-ride checks and the monthly chain lube. Get comfortable with those before you tackle anything else. You'll be surprised how much you learn just by paying attention to your trike over time.
And when something is beyond your comfort level — take it to a shop. A good e-bike mechanic is worth knowing. Most of them are happy to show you what they're doing if you ask.